Enhance Your Trade Show Presence: Assembling a Global Truss F34 Booth with Rounded Corners

Emmanuel Josue

Are you ready to steal the spotlight at your next trade show? Look no further than the Global Truss F34 system, your ticket to creating an impressive booth that captures attention and leaves a lasting impression. In this easy-to-follow guide, we'll walk you through assembling a 10'x10'x10’ U-shaped trade show booth using top-quality Global Truss components, perfect for industry leaders and companies looking to showcase their brand with style.

Introduction: Shine Bright with Global Truss F34 Stage Truss System

Trade shows are the perfect stage for industry leaders and companies to showcase their products and innovations. With the Global Truss F34 Stage Truss system, you can elevate your trade show presence and stand out from the competition. Let's dive into the step-by-step process of assembling your booth.

Materials:

We will use the following Global Truss products for this project:

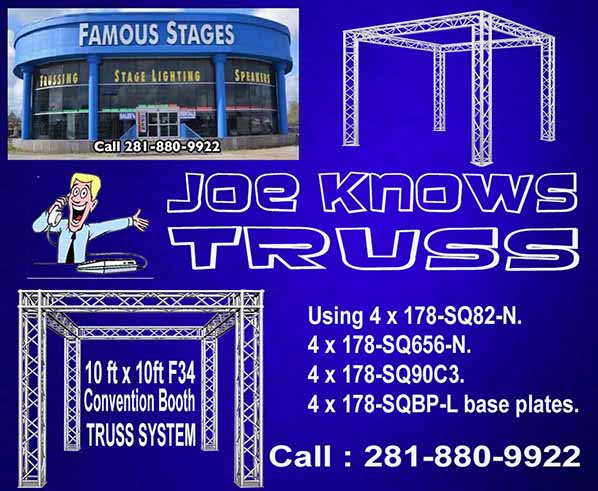
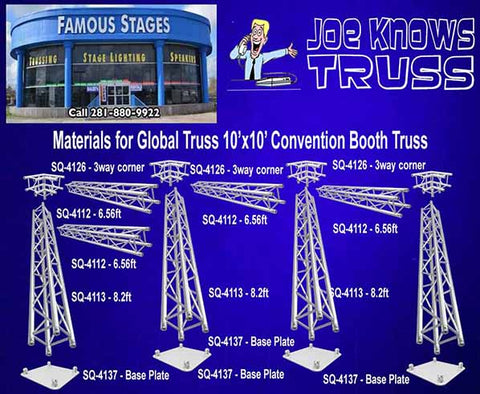
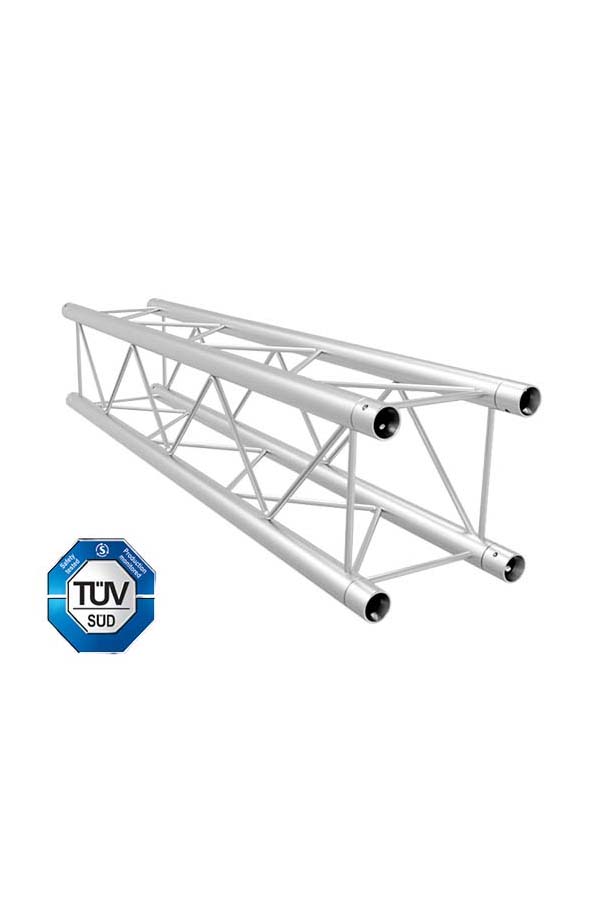
  • 3 pcs. Global Truss SQ-4112 6.56 ft. long F34 Square Truss Segments: These versatile truss segments provide robust support for your booth structure, ensuring stability and durability throughout the event.
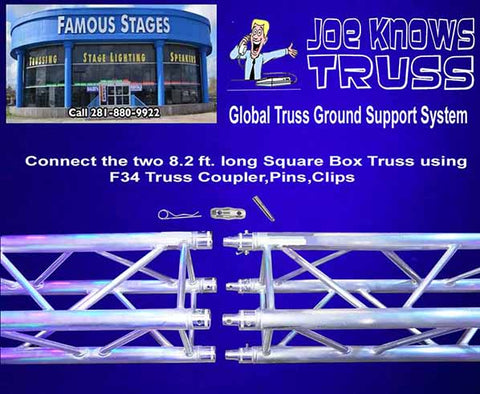
  • 4 pcs. Global Truss SQ-4113 8.2' ft. long F34 Square Truss Segments: Designed for maximum strength and flexibility, these truss segments serve as the vertical pillars of your booth, showcasing your brand with elegance and style.
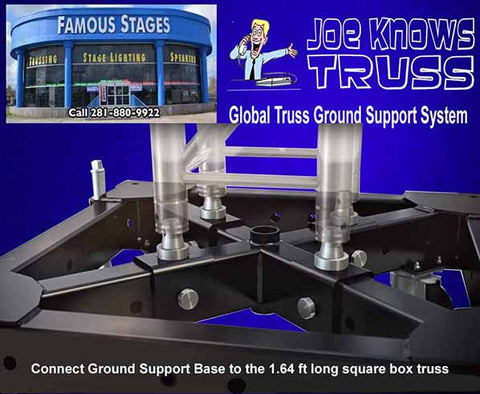
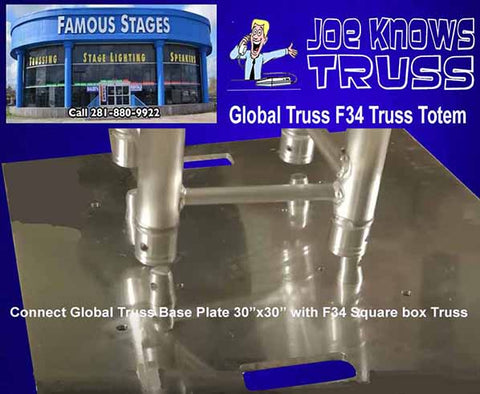
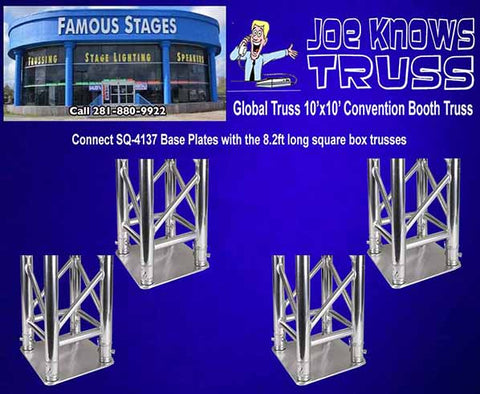
  • 4 pcs. Global Truss SQ-4137 1' x 1' Base Plates: Lay the groundwork for your booth's stability with these sturdy base plates, engineered to withstand the demands of the trade show environment.
  • 2 pcs. Global Truss SQ-4126-CR-L90 90-deg. 3-Way Rounded Corners: Add a touch of sophistication to your booth's design with these sleek rounded corners, seamlessly blending style and functionality.
  • 2 pcs. Global Truss SQ-4121-CR-L90 90-deg. 2-Way Rounded Corners: Enhance the structural integrity of your booth while elevating its visual appeal with these stylish rounded corners, designed to impress both industry leaders and attendees alike.

With this carefully curated selection of Global Truss products, you can create a trade show booth that not only stands out but also reflects the professionalism and innovation of your brand. Let's dive into the step-by-step process of assembling your booth and making a lasting impression on your audience.

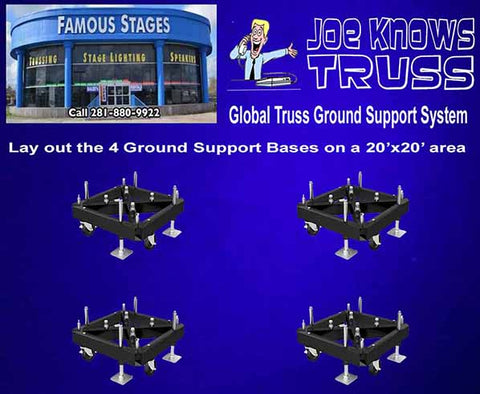
Step 1: Lay the Groundwork with Stable Base Plates

Start by securing the sturdy Global Truss SQ-4137 1'x1' Base Plates in your desired layout. These plates provide a solid foundation, ensuring your booth stands strong throughout the event, no matter how bustling it gets

Step 2: Build Up the Backbone for Stability

Assemble your vertical uprights using the reliable Global Truss SQ-4113 8.2' ft. long F34 Square Truss Segments. Attach them securely to each base plate to create the framework of your booth, guaranteeing stability even in the busiest environments.

Attach 4 Global Truss SQ-4137 base plates with the 4 SQ-4113 8.2 ft long Box Truss

Step 3: Add Flair with Rounded Corner Pieces

Now, let's add some flair with the sleek Global Truss SQ-4126-CR-L90 90-deg. 3-Way Rounded Corners at the back, and the stylish Global Truss SQ-4121-CR-L90 90-deg. 2-Way Rounded Corners at the front. These corner pieces not only enhance stability but also add a touch of sophistication to your booth's design.

Connecting Global Truss F34 Square Box Truss segments with Global Truss SQ-4126-CR-L90 90-deg. 3-Way Rounded Corners

Connecting Global Truss F34 Square Box Truss segments with Global Truss SQ-4121-CR-L90 90-deg. 2-Way Rounded Corners

Step 4: Connect Horizontal Truss Segments for Flexibility

Use the versatile Global Truss SQ-4112 6.56 ft. long F34 Square Truss Segments to connect the front and back uprights horizontally. These segments allow you to customize your booth's dimensions while providing sturdy support for lighting and other accessories.

Connecting the upper part of the trade Show Booth with rounded corners

Note: if you have  available Global Truss Crank Stands, you may connect the  Global Truss SQ-4112 6.56 ft. long F34 Square Truss Segments  with the front  Global Truss SQ-4121-CR-L90 90-deg. 2-Way Rounded Corners and the back Global Truss SQ-4126-CR-L90 90-deg. 3-Way Rounded Corners  to form the U-shaped upper part of the Convention Booth truss right on the ground. You can use about 3 cranks stands to lift the upper part and connect it to four vertical Global Truss SQ-4113 8.2' ft. long F34 Square Truss Segments with attached Global Truss SQ-4137 1'x1' Base Plates. Otherwise, you may need some helping hands (at least 2-3 people) and at least 2-4 step ladders to accomplish Step 1 to 4.

Step 5: Ensure Stability and Safety

Before moving forward, double-check the stability and safety of your booth structure. Confirm all connections are secure and stable, ensuring a safe environment for both attendees and staff throughout the event.

Step 6: Add Lighting and Accessories for Impact

With the main structure in place, it's time to enhance the visual appeal of your booth. Illuminate your products and branding with stage lighting truss and add any other accessories to showcase your offerings in the best light possible.

Step 7: Test and Get Ready to Wow

Conduct a final test to ensure everything is in working order and ready to impress. Shake the booth gently to simulate movement and make any final adjustments as needed. Now, get ready to wow industry leaders and companies with your stunning Global Truss booth!

Conclusion: Make Your Mark with Global Truss F34 Stage Truss System

Creating a standout trade show booth has never been easier with Global Truss F34. Follow these steps and use top-quality components to create a booth that not only grabs attention but also reflects the professionalism and innovation of your brand. Elevate your trade show presence with Global Truss F34 and make your mark in the industry!

Read more →

Elevate Your Stage Game: The Ultimate Guide to Global Truss Portable Stages

Emmanuel Josue

Introduction:

Hey there, fellow stage enthusiast! Ready to transform your stage dreams into reality? Buckle up because we're about to embark on a thrilling journey with FamousStages.com, your ultimate destination for stage production equipment, including the renowned Global Truss systems. In this detailed guide, we'll walk you through assembling a rock-solid, flexible stage using Global Truss components. Let's dive in and create a stage that'll have performers and audiences cheering for more!

Step 1: Gather Your Gear

First things first – let's ensure you have everything you need to kick off your stage-building adventure:

  • Global Truss GT-Stage Adjust Panels (around 15 panels of Global Truss GT-STAGE-ADJUST 1.2)
  • GT-STAIR for easy stage access
  • GT-GRAIL for safety and protection
  • Plus, essential extras like bolts, nuts, and safety pins

 Materials for Global Truss Portable Stages


Step 2: Let's Get Building!

Now, let's roll up those sleeves and start assembling your GT-Stage Adjust Panels:

  • Lay out your GT-Stage Adjust panel on a flat, clean surface.
  • Attach the GT-STAGE LEG - COMP units to each corner, ensuring stability with adjustable height settings.
  • Securely fasten the units in place for rock-solid stability.
  • Connect the panels using GT-Stage Locks for a secure fit, allowing various configurations for your stage.

 Global Truss GT-Stage Adjust front and bottom view


 Attach Global Truss GT-Stage Legs to GT-Stage Adjust Panels


Connect 2 Global Truss GT-Stage Adjust panels 

Step 3: Sprinkle on Some Extra Magic

Add a few extra goodies to enhance your stage setup:

  • Install the GT-STAIR for convenient access.
  • Incorporate the GT-GRAIL for perimeter protection.

Install Global Truss GT-Stage Stair 


Install Global Truss GT-Stage GRail 


Step 4: Finishing Touches

Perform a final inspection to ensure everything is secure and aligned, meeting safety standards.

Conclusion:

Congratulations! With FamousStages.com and Global Truss, you've crafted a versatile, top-quality stage. Elevate your next event with confidence, knowing you've got the best equipment and expert guidance. Let's make your stage dreams a reality!

Read more →

Constructing a Solid Foundation: A Guide to Assembling Global Truss Ground Support Systems - Multi-Tower Basement Structure

Emmanuel Josue

Introduction:

Welcome to FamousStages.com, your premier destination for top-quality stage production equipment, including Global Truss systems. In this guide, we'll walk you through the process of erecting a sturdy ground support system using Global Truss components. Whether you're preparing for a concert, corporate event, or any other production, mastering the assembly of the ground support structure is crucial for building a reliable stage trussing setup. Let's dive into the step-by-step process to ensure your multi-tower basement structure stands strong and secure.

Step 1: Preparing Your Equipment

Before beginning assembly, ensure you have all the necessary components from your Global Truss ground support system kit. This includes:

a. Four sets of Global Truss GT1804 - GROUND-SUPPORT-SYSTEM-18.04-ft

 One set includes:

  • 1 Ton Manual Chain Hoist (30 ft) or Electric Chain Hoist
  • Ground Support Base (44BS-1)
  • Four Outriggers with Stabilizer Arms (GT-492145-1)
  • Sleeve Block (GT-BLOCK)
  • Top for Chain Motor (GT-TOP/CM)
  • Two 5/8-inch Steel Shackles
  • 9 ft Round Sling with Aircraft Cable Inside (WIREROPE9)
  • Left and Right 88mm Hinges for Ground Support System (HINGE/M12-L/88MM, HINGE/M12-R/88MM)
  • 1 piece Global Truss F34 12-inch Aluminum Square Box Truss 1.64 ft. long
  • 2 pieces Global Truss F34 12-inch Aluminum Square Box Truss 8.2 ft. long

 This set will serve as base and vertical post of the ground support system tower.

b. Four sets of F34 square trusses for the horizontal trusses

One set includes:

  • 1 piece Global Truss F34 12-inch Aluminum Square Box Truss 1.64 ft. long
  • 2 pieces Global Truss F34 12-inch Aluminum Square Box Truss 9.2 ft. long


Step 2: Setting Up the Ground Support Structure

Begin by laying out the four ground support bases on the ground on a square-shaped area which is approximately 20’ x 20’. Note that the base casters are for transporting the base only. The wheels are not designed for movement under load or to carry the load of the tower. You use and adjust the Screw Jack to stabilize firmly the ground support structure.

Lay out the 4 Ground Support Bases


Connect the Ground Support Base (44BS-1) to the 1.64 ft long square box truss. Once connected, position the Sleeve Block (GT-BLOCK) on top of the Ground Support base with the 1.64 ft. long square box truss inside the Sleeve Block, emphasizing its importance in supporting the horizontal and vertical trusses.


Connect the Ground Support Base (44BS-1) to the 1.64 ft long square box truss.


Place the Global Truss Sleeve Bock on top of the Ground Support Base


Next, connect the two 8.2 ft square box trusses using truss couplers, pins and clips, then connect these trusses to the 1.64 ft long square box truss using the Left and Right 88mm Hinges (HINGE/M12-L/88MM, HINGE/M12-R/88MM). Ensure the connections are secure, as this forms the foundation for the vertical posts/tower. Also, connect the Top for Chain Motor (GT-TOP/CM) on one end of the vertical truss which will be the topmost part of the vertical post/tower.


Connect the 2 8.2 ft. Square Box Trusses

Connect the 2 vertical truss to the 1.64 ft. square box truss


Step 3: Erecting the Vertical Trusses

With the Ground Support Base, 1.64 ft long square truss and Sleeve Block in place, proceed to erect the vertical trusses of each ground support system set. Position them securely on top of the ground support bases, ensuring alignment and stability.


Erect the vertical trusses of each ground support system tower set


Step 4: Attaching Horizontal Trusses

After setting up the ground support structure, it's time to incorporate the horizontal trusses, crucial for structure’s stability and functionality. Begin by securely attaching the two 9.02 ft long square box trusses and the 1.64 ft long square box truss together, forming a robust horizontal assembly. Ensure a tight connection using reliable hardware, highlighting the durability of Global Truss stage trussing solutions.

Connect the horizontal trusses in between the Sleeve Blocks (GT-BLOCK) forming a square-shaped horizontal truss assembly.  


Connect the horizontal Global Truss Square Box Trusses in between the Global Truss Sleve Blocks


Utilize the manual Chain Hoist (CHAIN HOIST30) to raise the connected horizontal trusses towards the top of the vertical posts, underscoring the versatility of Global Truss systems in stage truss construction. You can also use an electric chain hoist in place of the manual one to raise the structure easier.


 Step 5: Adding Stabilization

Install the Outriggers with Stabilizer Arms (GT-492145-1) to each Ground Support Base, providing additional stability and support to the structure. Adjust the stabilizer arms as needed to ensure proper balance and alignment.

Step 6: Final Adjustments and Safety Checks

Before proceeding further, conduct thorough safety checks to ensure the stability and integrity of the ground support structure. Inspect all connections, hardware, and rigging for any signs of weakness or instability.

Make any necessary adjustments or reinforcements to address potential hazards and ensure the structure is safe for use.

Conclusion:

With the ground support structure assembled, you've laid a solid foundation for your stage setup using Global Truss components. In our next blog, we'll explore the assembly of stage components          within this structure, creating a complete stage platform for your event needs. Stay tuned to FamousStages.com for more expert guidance on stage production equipment and techniques.

Read more →

Step-by-Step Guide: Assembling a Global Truss F34 Square Box Truss Totem for Stage Lighting

Emmanuel Josue

Introduction:

Stage trussing stands as a cornerstone of event production and stage design, offering a sturdy framework for lighting fixtures and equipment. Paired with a Global Truss 30"x30" base plate, the Global Truss F34 Square Box Truss provides unparalleled stability and adaptability, ideal for creating captivating stage setups. In this comprehensive guide, we'll walk you through assembling a Global Truss F34 Square Box Truss Totem, ensuring both structural integrity and visual excellence.

Gather Your Materials:

Begin by gathering all the necessary components for the truss totem assembly, including Global Truss F34 square box truss segments, a Global Truss 30"x30" base plate, F34 Truss Pins, R-Clips, and any additional rigging accessories.

Prepare the Base Plate:

Position the Global Truss 30"x30" base plate on a level and stable surface in your desired location for the truss totem.


Place Global Truss Base Plate 30x30 on flat surface/ground


Assemble the Truss Segments:

Select suitable Global Truss F34 square box truss segments to achieve your desired height. Connect the segments using compatible connectors, ensuring each connection is secure and aligned.


Global Truss F34 Square Box Truss


Attach the Truss to the Base Plate:

Securely fasten the base plate to the bottom truss segment using F34 Truss Pins and R-Clips. Insert the Truss Pins through the pre-drilled holes in the truss and base plate, then secure them in place with R-Clips for a stable connection.


Connect Global Truss 30x30 Base Plate with F34 Square Box Truss


Attach the Top Plate:

If you're planning to mount moving head lighting fixtures, securely attach either an SQ-4137 Base Plate or a GT-MH Base Plate to the top truss segment. Use appropriate hardware provided by the manufacturer to ensure a stable connection.


Connect Global Truss Top Plate with F34 Square Box Truss


Rigging and Attachment:

Rig and attach lighting fixtures or equipment, including truss lighters, according to manufacturer recommendations. Distribute weight evenly to prevent overloading.

Test Stability and Balance:

Perform a stability test by gently applying pressure to different points of the truss totem, checking for wobbling or instability. Make adjustments as necessary to ensure stability.

Lift the Truss Totem:

With assistance, carefully raise the truss totem to its full height using appropriate safety measures such as harnesses or safety ropes.

Secure in Position:

Once in position, securely tighten clamps or bolts connecting the truss totem to the base plate, ensuring stability.

Final Checks and Adjustments:

Conduct a thorough inspection for loose connections or signs of instability, making necessary adjustments to ensure safety and security.

Conclusion:

Assembling a Global Truss F34 Square Box Truss Totem for stage lighting requires meticulous attention to detail. By following this step-by-step guide, you'll create a truss totem that not only enhances your stage setup's visual impact but also prioritizes safety, ensuring unforgettable experiences for your audience, whether you're an experienced event professional or new to stage design.

Read more →

Constructing a Dynamic Global Truss F34 10' X 10' Display Booth Truss System: A Step-by-Step Guide

Emmanuel Josue

Constructing a Dynamic Global Truss F34 10' x 10' Display Booth Truss System can be an engaging project that requires attention to detail and some basic understanding of structural assembly. Here's a step-by-step guide to help you build your display booth:

Step 1: Preparation

  • Materials Needed: Ensure you have all the necessary parts of the Global Truss F34 system, including truss sections, base plates, conical connectors, safety pins, and a hammer or mallet for securing the connections.
  • Safety Gear: Wear appropriate safety gear, including gloves and eye protection.
  • Space: Clear a large, flat area for assembly.

 Global Truss Stage Trussing materials needed for the project


Step 2: Layout

  • Lay out the truss pieces on the ground in the shape of your 10' x 10' booth. This typically involves four corner pieces, four straight pieces for the sides, and cross-pieces for added stability and support.

Step 3: Assemble Base

  • Start by attaching the base plates to the bottom of each corner piece. Ensure the base plates are securely fastened to provide a stable foundation.
  • Erect the corner pieces on their base plates in their approximate locations.

Connect SQ-4137 base plates with the 8.2ft long square box vertical trusses

Step 4: Connect Trusses

  • Begin connecting the straight truss sections to the corner pieces. The F34 system uses conical connectors that fit into the ends of the truss sections. Insert the connectors into one end, align the next truss section, and gently tap the pieces together with a mallet.
  • Secure each connection with the provided safety pins to ensure the structure is locked in place.

 Connect the SQ-4126 3-way Corner with 6.56ft long horizontal trusses and 8.2ft long vertical trusses


Step 5: Add Cross Supports

  • If your design includes cross supports for added stability or to hang displays, attach these now. Similar to the straight sections, use the conical connectors and safety pins to secure the cross-pieces in place.

Step 6: Raise Structure

  • With the help of at least one other person, carefully lift the structure into an upright position. Ensure all base plates are flat on the ground and the structure is stable.

Step 7: Final Adjustments

  • Walk around the structure to ensure all connections are secure and the booth is square and stable. Make any necessary adjustments.
  • Attach any additional elements such as lighting, banners, or displays to the truss system, following the manufacturer's recommendations for weight limits and securing methods.

Step 8: Safety Check

  • Perform a final safety check to ensure everything is secure. Check all connections, ensure the structure is stable, and confirm that all displays are safely attached.

Tips:

  • Always refer to the manufacturer's instructions for specific details regarding assembly and safety precautions.
  • If you're unfamiliar with truss systems or concerned about safety, consider hiring a professional to assist with the assembly.
  • Regular maintenance checks are important to ensure the long-term stability and safety of your truss system.

This guide provides a general overview, and it's crucial to adapt the steps as needed based on the specific design and components of your Global Truss F34 system. Stay safe and enjoy your new display booth!

Read more →

Elevating Entertainment: The Power of Stage Trussing by Global Truss & Famous Stages

Emmanuel Josue

Unveiling Stage Trussing

Stage trussing serves as the backbone of live events, offering structural support while facilitating the integration of lighting, audio, and visual elements. Global Truss, a leader in trussing innovation, delivers cutting-edge solutions renowned for their durability and versatility. At famousstages.com, customers gain access to a comprehensive selection of Global Truss products, tailored to meet the diverse demands of entertainment professionals.

Shaping the Entertainment Landscape

Global Truss and famousstages.com have made significant contributions to the entertainment industry, providing stage trussing solutions that have left an indelible mark on stages worldwide. Behind the scenes, their partnership ensures seamless performances, with Global Truss systems providing robust support for elaborate lighting rigs and audio equipment.

The Role of Lighting Trussing

Lighting trussing plays a crucial role in enhancing the visual experience of live performances, allowing lighting designers to craft immersive environments that captivate audiences. At famousstages.com, customers can explore a vast array of lighting trussing options, meticulously engineered to meet the demands of modern productions.

  • Versatility: Lighting trussing sourced from famousstages.com offers unparalleled flexibility, enabling designers to create custom configurations tailored to the unique requirements of each venue and performance.
  • Innovation: With Global Truss's commitment to innovation and famousstages.com's dedication to customer satisfaction, customers can expect cutting-edge solutions that push the boundaries of what's possible in live entertainment.

Partnering for Success

Beyond providing world-class products, famousstages.com goes the extra mile to support its customers, offering free stage trussing design services. With a team of experienced professionals, customers receive personalized assistance in creating bespoke trussing solutions that elevate their productions to new heights.

Conclusion

In the dynamic world of entertainment production, stage trussing serves as the cornerstone of unforgettable performances. Through the partnership between Global Truss and famousstages.com, entertainment professionals gain access to top-tier products and unrivaled support, ensuring that every production shines bright and leaves a lasting impression on audiences worldwide.

For more information on stage trussing solutions, visit famousstages.com and discover how the industry leaders can elevate your next event to new heights.

Read more →

Unveiling the Beauty and Functionality of Stage Trussing: A Comprehensive Guide

Emmanuel Josue
Introduction:
Stage trussing is an integral element of modern stage design, offering both practical functionality and aesthetic appeal. Whether you’re attending a concert, a theatrical performance, or a corporate event, chances are you’ve witnessed the striking presence of stage trussing structures. In this comprehensive guide, we delve into the world of stage trussing, exploring its history, design, applications, and the technology behind its evolution.
 
The Origins of Stage Trussing:
Trussing, in its simplest form, dates back centuries, finding its origins in architecture and engineering. Historically, trusses were used to support roofs and bridges, characterized by their triangular framework which distributes weight evenly. In the realm of stage production, stage trussing emerged as a solution to support heavy lighting and sound equipment, allowing for flexible configurations and dynamic stage setups.
 
Design and Construction:
Modern stage trusses are typically constructed from aluminum or steel, chosen for their lightweight yet sturdy properties. These materials offer the strength needed to support heavy loads while remaining versatile enough to be shaped into various configurations. Stage trusses come in a variety of shapes and sizes, including box truss, triangular truss, and ladder truss, each offering different load-bearing capacities and aesthetic possibilities.
 
Applications:
The versatility of stage trussing extends across various industries and applications. In the entertainment world, stage trusses are ubiquitous in concerts, festivals, and theatrical productions, providing support for lighting rigs, audio equipment, and video displays. Corporate events and trade shows also utilize stage trussing to create impactful presentations and immersive brand experiences. Furthermore, stage trussing plays a crucial role in architectural lighting and installations, offering a sleek and modern aesthetic for retail spaces, museums, and other public venues.
 
Technology and Innovation:
Advancements in technology have revolutionized the capabilities of stage trussing, allowing for greater flexibility, efficiency, and safety. Automated rigging systems enable precise control over truss movement and positioning, enhancing the overall production value and streamlining setup processes. Additionally, integrated lighting and multimedia features have transformed stage truss structures into dynamic visual elements, capable of creating immersive experiences and captivating audiences like never before.
 
Famous Stages and Global Truss Partnership:
One notable partnership in the world of stage trussing is between Famous Stages and Global Truss. Famous Stages stands as one of the largest dealers of Global Truss, the renowned aluminum stage trussing manufacturer company in America. This collaboration allows Famous Stages to offer a wide range of high-quality trussing solutions to customers, contributing to both companies' success in providing top-notch stage equipment and services to the market.
 
Safety Considerations:
While stage trussing enhances the visual impact of live events, it’s essential to prioritize safety at all times. Proper installation, rigging, and load calculations are paramount to prevent accidents and ensure the stability of the structure. Regular inspections and maintenance are also crucial to identify any potential issues and address them proactively. By adhering to industry standards and best practices, event professionals can ensure the safety and success of their productions.
 
Conclusion:
Stage trussing is much more than a structural support system; it's a symbol of innovation, creativity, and technical prowess in the world of live entertainment and beyond. From its humble origins in architecture to its modern-day applications in concerts, events, and installations, stage trussing continues to captivate audiences and elevate the visual landscape of our shared experiences. As technology advances and design boundaries are pushed, the future of stage trussing holds endless possibilities, promising even more awe-inspiring spectacles for generations to come.

Read more →